Everything You Need To Know About Cloud Security
As more and more businesses are moving to the cloud, the misconception that the cloud computing security isn’t safe is slowly going away.
Every organization across the globe prioritises securing its data. When it comes to Microsoft services, cloud security and compliance is the utmost prior concern. Microsoft ensures your data is always secure from every type of attacks.
Using Microsoft cloud security for products: Personal account or work account your data will be always secure. This blog will give you more insight from the perspective of work accounts. The types of security services available on Office 365.
Let’s discuss some types of security services offered by Microsoft on Office 365.
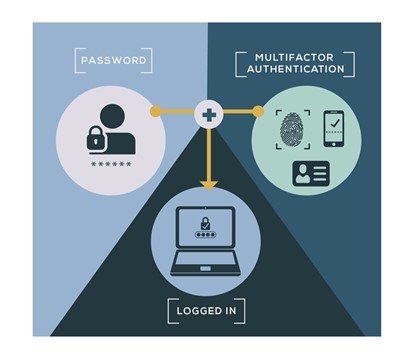
1. Multi-Factor Authentication/2FA:
Multi-Factor authentication adds an additional security layer to the user’s accounts.
When users try to sign in on to their office products the legacy way is to sign in with a username and password. However, when MFA is enabled on a user account it needs approval from the user to proceed with the authentication.
There are various ways through which one can use MFA functionality, The type of authentication modes are:
- Code on mobile phone/email.
- Mobile authenticator app.
- Use a biometric key or hardware token

If you have the least privilege's license even on those accounts MFA can be enabled, also this Microsoft cloud security feature needs to be only enabled by your Company Administrators but cannot be enabled by users. Admins can enable it for an organization by following below steps:
- Go to the admin center at https://admin.microsoft.com.
- Select Show All, then choose the Azure Active Directory Admin Center.
- Select Azure Active Directory, Properties, Manage Security defaults.
- Under Enable Security defaults, select Yes and then Save.
Once MFA has been enabled by an administrator on user’s accounts. It's the user who will proceed with the setup or registration process of the account.
- When you sign in to https://office.com, you'll see the More information required prompt. Choose Next.
- Under Step 1, choose the Mobile app from the Authentication phone drop-down list.
- How do you want to use the mobile app? select the method you want to use to sign in:
- Select receive notifications for verification to authenticate directly from your mobile app, which includes fingerprint authentication.
- Select use verification code to enter a new verification code each time you authenticate.
- Choose set-up.
- Leave the configure mobile app window open on your computer.
- On your mobile device, go to the App Store or Play Store, search for "Microsoft Authenticator " select it, install it, and open it.
- In Authenticator, follow the prompts to complete the setup, and then choose the plus (+) sign to add your account.
- Choose work or school account, choose Allow when prompted for permission to take pictures and record video, and then follow the instructions to scan the QR code in the open window on your computer.
- After the account has been added, choose Got It.
- On your computer, choose Next, and then choose Next again.
- Make a note of the code that appears on your mobile device, enter the code on your computer in the box under Step 2, and then choose Verify.
- In the boxes under Step 3, enter a backup phone number, such as your office number, choose Next, and then choose Done.
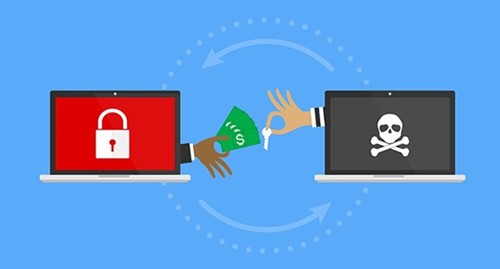
2. Enable Ransomware:
Ransomware restricts access to data by encrypting files or locking computer screens. It attempts to extort money from victims by asking for "ransom," usually in form of cryptocurrencies like Bitcoin, in exchange for access to data.
You can protect against ransomware by creating one or more mail flow rules to block file extensions. They are commonly used for ransomware, or to warn users who receive these attachments in email. A good starting point is to create two rules:
- Warn users before opening Office file attachments that include macros. Ransomware can be hidden inside macros, so we'll warn users to not open these files from people they do not know.
- Block file types that could contain ransomware or other malicious code. We'll start with a common list of executables (listed in the table below). If your organization uses any of these executable types and you expect these to be sent in email, add these to the previous rule (warn users).
To create a mail transport rule, the steps below
- Go to the Exchange admin center.
- In the mail flow category, select rules.
- Select +, and then Create a new rule.
- Select **** at the bottom of the dialogue box to see the full set of options.
- Apply the settings in the following table for each rule. Leave the rest of the settings at the default, unless you want to change these.
- Select Save.
3. Office 365 defender:
Office 365 Defender former name Advanced Threat Protection helps by stopping these malicious links and attachments before they get to your inbox. It opens the attachments and links in a virtual environment and checks for malicious activity before the email gets to your inbox.
It comprises of various cloud security solutions such as:
- Safe attachments
- Safe links
- Spoofing
- Anti-Phishing attack
- Anti-Spam
These Microsoft cloud security features ensure the incoming and outgoing emails from organizations are safely sent and deliver to user’s mailboxes.
![]()